Tracking localhost on Analytics in Google Tag Manager can be useful for testing and developing websites. It allows you to see how users are interacting with your site before it goes live, so you can make any necessary adjustments.
There are two main ways to track localhost on Analytics in Google Tag Manager:
Using the “Google Analytics: Universal Analytics” tag:
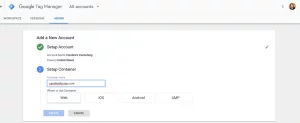
Step 1: Create a new tag of type “Google Analytics: Universal Analytics”.
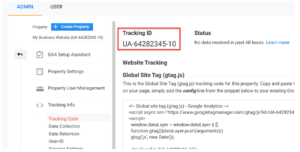
Step 2: In the “Tracking ID” field, enter your Google Analytics tracking ID.
Step 3: In the “More Settings” section, expand the “Domains and Directories” section and set “Domain Name” to “none”.
Step 4: Save the tag.
Using the “Google Analytics: GA4 Configuration” tag:
Step 1: Create a new tag of type “Google Analytics: GA4 Configuration”.
Step 2: In the “Measurement ID” field, enter your Google Analytics 4 measurement ID.
Step 3: In the “More Settings” section, expand the “Cookie Configuration” section and set “Cookie Domain” to “none”.
Step 4: Save the tag.

Once you have created the tag, you need to create a trigger to fire it. You can create a trigger to fire the tag on all pages, or you can create a more specific trigger to fire the tag on certain pages or when certain events occur.
To create a trigger to fire the tag on all pages:
* 👁️ Click the "Triggers" tab and click the "New" button.
* 👁️ Select "Page View" from the list of trigger types and click the "Create" button.
To create a more specific trigger:
* 👁️ Click the "Triggers" tab and click the "New" button.
* 👁️ Select the trigger type that you want to use and configure the trigger settings. For example, if you want to fire the tag when a user clicks on a button, you would select the "Click" trigger type and configure the trigger to fire when the element with the CSS selector ".my-button" is clicked.
Once you have created the trigger, you need to link it to the tag. To do this:
* 🔗 Click the "Tags" tab and click the name of the tag that you want to link the trigger to.
* 🔗 In the "Triggering" section, click the "Add" button and select the trigger that you want to link to the tag.
Click the “Save” button to save your changes.
Once you have saved your changes, the tag will be fired whenever the trigger that is linked to it is activated. You can then view your Analytics data to see how users are interacting with your site on localhost.
Here are the additional tips for tracking localhost on Analytics in Google Tag Manager with relevant emojis:
- Use a separate Google Analytics property for your localhost development environment 💻. This will help you to keep your development data separate from your production data.
- Create a custom dimension or custom metric to track localhost traffic 📊. This will allow you to easily segment your Analytics data to see how users are interacting with your site on localhost.
- Use the Google Tag Manager Preview mode to test your tags and triggers 👁️. This will allow you to see how your tags and triggers will fire before you publish them to your live site.
Here are some examples of how you can use custom dimensions and custom metrics to track localhost traffic:
- Custom dimension: Create a custom dimension to track the hostname of the user’s browser 🌐. This will allow you to see which localhost domains are being used.
- Custom metric: Create a custom metric to track the number of pageviews on localhost 📈. This will allow you to see how much traffic is being generated to your localhost development environment.
By following these tips, you can easily track localhost on Analytics in Google Tag Manager 🎯. This will help you to test and develop your websites more effectively. 🚀
If you still looking for help you can contact us at TheTrackingAgency and we will be happy to assist you.